ZITADEL with Django Python
This integration guide demonstrates the recommended way to incorporate ZITADEL into your Django Python application. It explains how to enable user login in your application and how to incorporate the ZITADEL users into the existing AuthenticationBackend.
By the end of this guide, your application will have login functionality with basic role mapping, admin console and polls as described in the Django guide.
This documentation references our example on GitHub.
ZITADEL setup
Before we can start building our application, we have to do a few configuration steps in ZITADEL Console.
Project roles
The Example expects user roles to be returned after login. This example expects 3 different roles:
admin: superuser with permissions to use the admin consolestaff: user with permissions to see results of the pollsuser: normal user with permission to vote on the existing polls
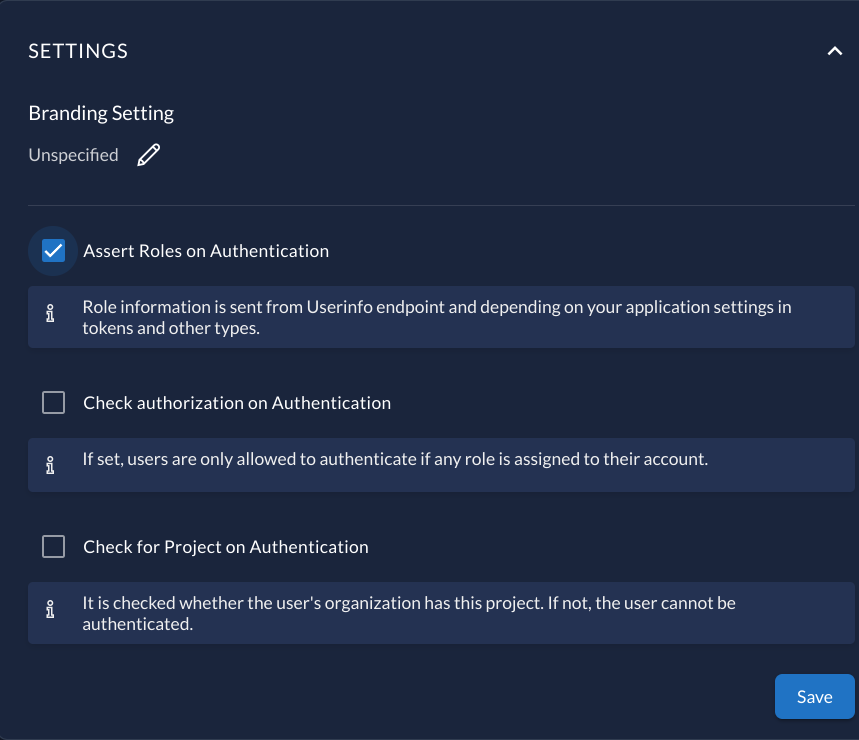
In your project settings make sure the "Assert Roles On Authentication" is enabled.
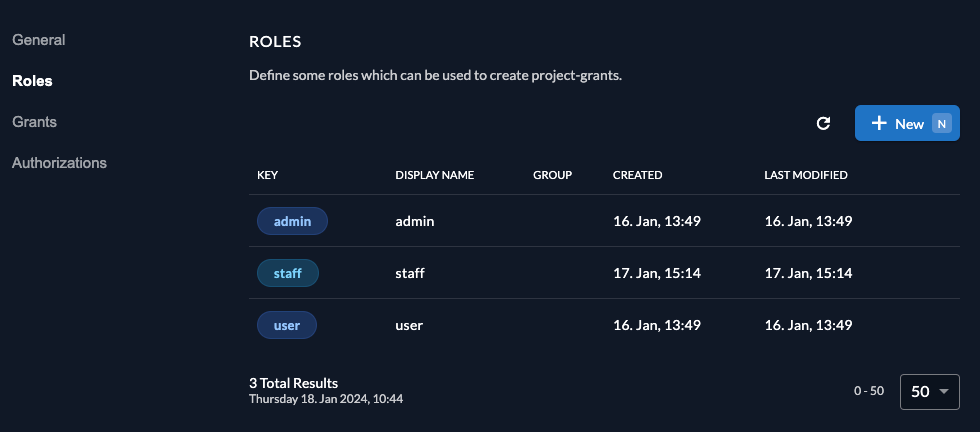
In the project Role tab, add 3 special roles:
adminstaffuser
If none of the roles is provided as a user, the user in Django will not be created.
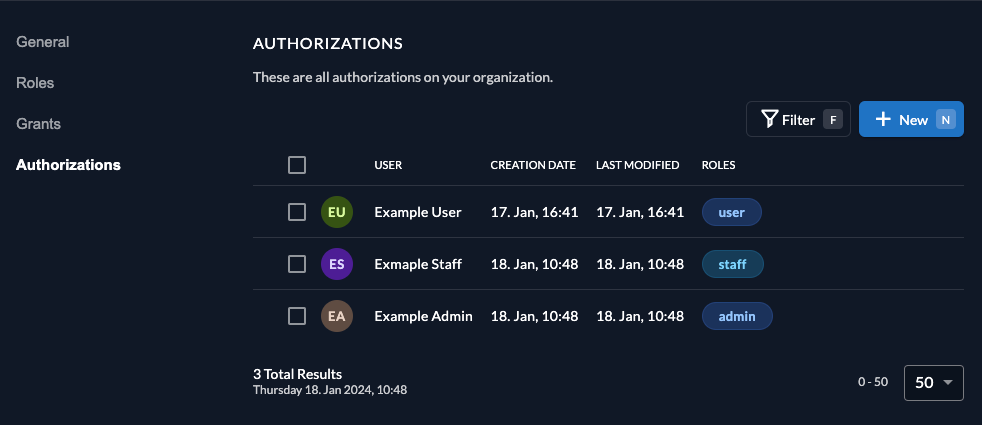
Finally, we can assign the roles to users in the project's authorizations tab.
Set up application and obtain secrets
Next you will need to provide some information about your app.
In your Project, add a new application at the top of the page. Select Web application type and continue. We use Authorization Code for our Django application.
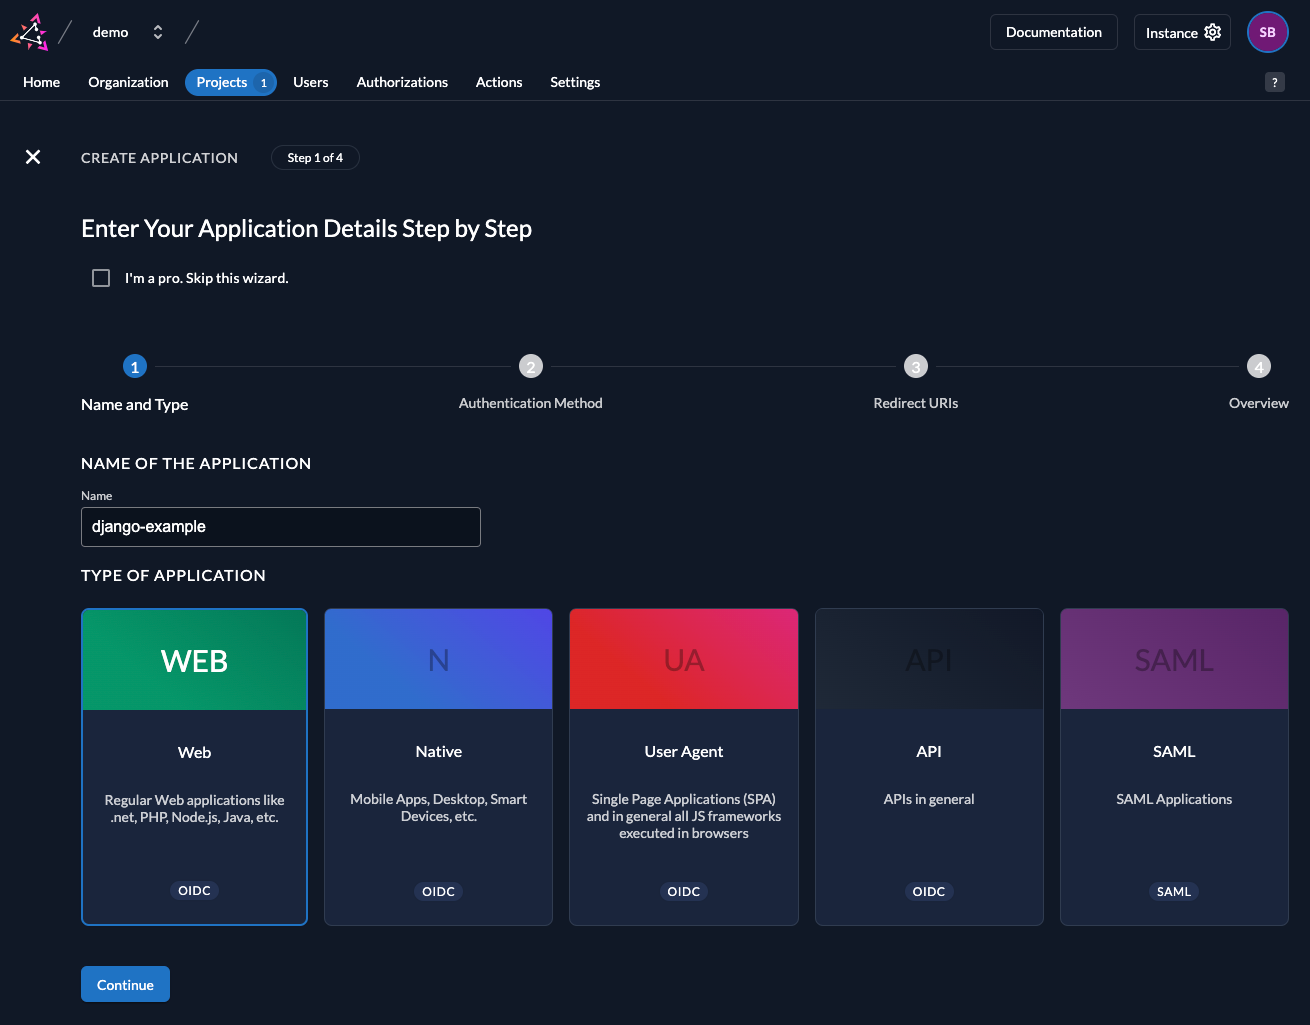
Select CODE in the next step. This makes sure you still get a secret. Note that the secret never gets exposed on the browser and is therefore kept in a confidential environment. Safe the generated secret for later use.
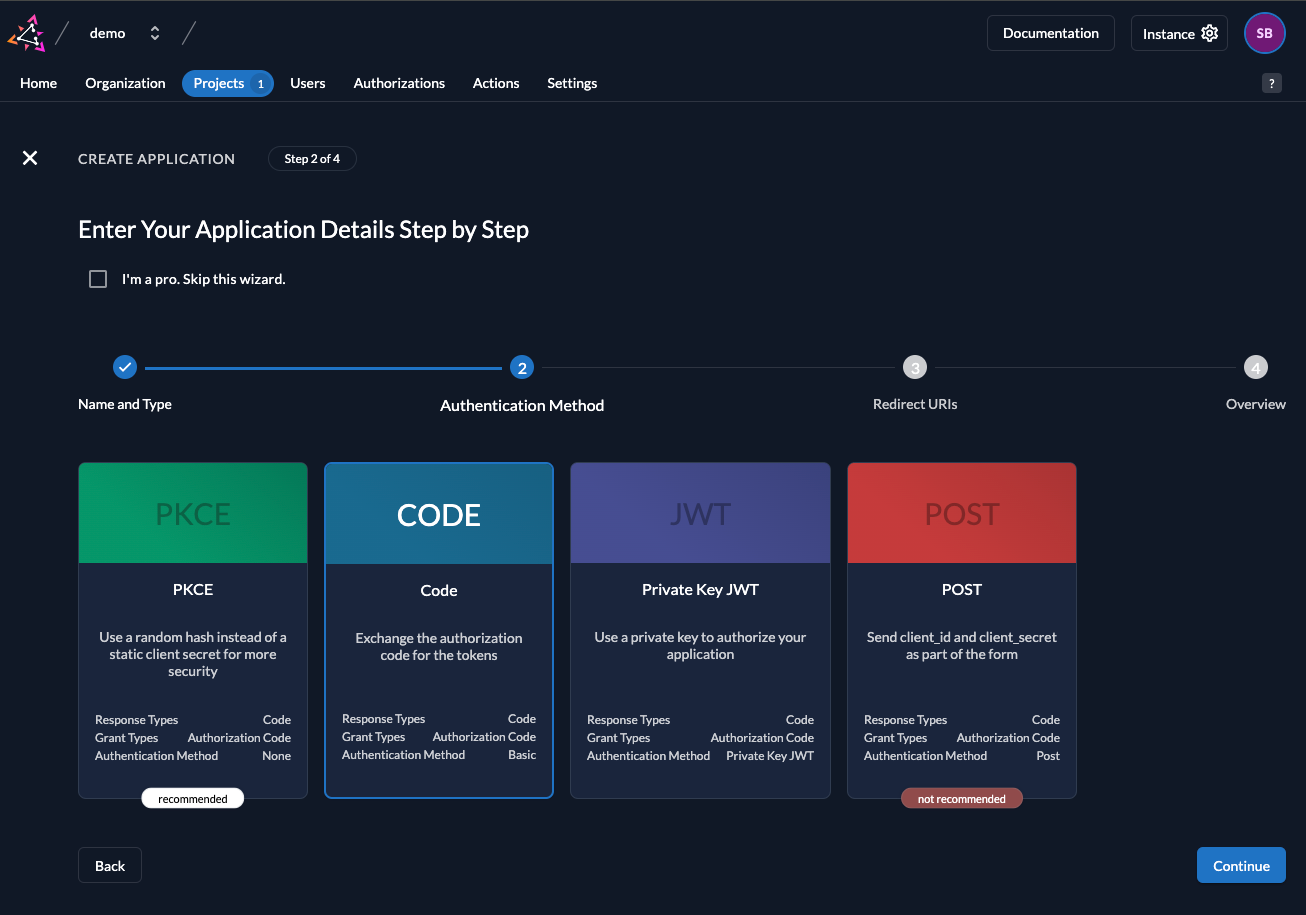
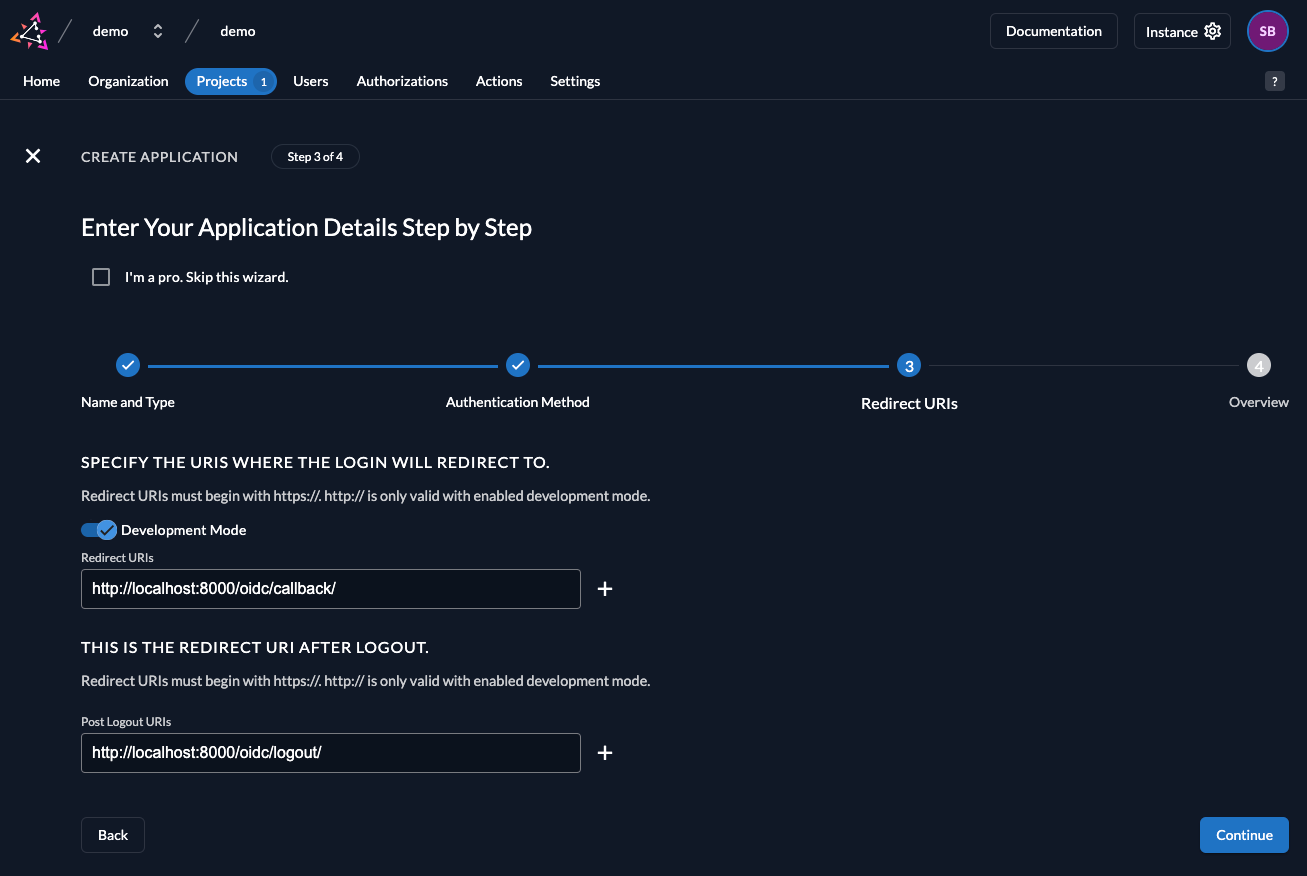
With the Redirect URIs field, you tell ZITADEL where it is allowed to redirect users to after authentication. For development, you can set dev mode to true to enable insecure HTTP and redirect to a localhost URI.
For the example application we are writing use:
http://localhost:8000/oidc/callback/as Redirect URIhttp://localhost:8000/oidc/logout/as post-logout URI.
After the final step you are presented with a client ID and secret. Copy and paste them to a safe location for later use by the application. The secret will not be displayed again, but you can regenerate one if you loose it.
Setup new Django application
Setup Python
You have to install Python as described in their documentation.
Install dependencies
For this example we need the following dependencies:
django: to create an API with djangopython-dotenv: to use environment variables in the configurationmozilla-django-oidc: client-side OIDC functionality
For the dependencies we need a requirements.txt-file with the following content:
loading...
Then install all dependencies with:
python -m pip install -U requirements.txt
The used base is the "Writing your first Django app" from the Django documentation under https://docs.djangoproject.com/en/5.0/intro/, which has documented additional parts in to use mozilla-django-oidc to integrate ZITADEL as AuthenticationBackend.
Skip this step if you are connecting ZITADEL to an existing application.
Define the Django app
Create the settings.py to include mozilla-django-oidc
To use the mozilla-django-oidc as AuthenticationBackend, there are several things to add to the settings.py, as described in the documentation "Add settings to settings.py":
Add INSTALLED_APPS:
INSTALLED_APPS = [
    ...
    "mozilla_django_oidc",  # Load after auth
    ...
]
Add MIDDLEWARE:
MIDDLEWARE = [
    #...
    "mozilla_django_oidc.middleware.SessionRefresh",
]
Add AUTHENTICATION_BACKENDS:
AUTHENTICATION_BACKENDS = (
    "mysite.backend.PermissionBackend",
)
Add configuration:
loading...
and create a ".env"-file in the root folder with the configuration:
ZITADEL_PROJECT = "ID of the project you created the application in ZITADEL"
OIDC_RP_CLIENT_ID = "ClientID provided by the created application in ZITADEL"
OIDC_RP_CLIENT_SECRET = "ClientSecret provided by the created application in ZITADEL"
OIDC_OP_BASE_URL = "Base URL to the ZITADEL instance"
which should then look something like this:
ZITADEL_PROJECT = "249703732336418457"
OIDC_RP_CLIENT_ID = "249703852243222581@python"
OIDC_RP_CLIENT_SECRET = "Zy3OOHaMBTj2sfamW77Vak5BeQ3nEpOf7suPKTnJKaScMh0lPJqUeDOZmgL3bds0"
OIDC_OP_BASE_URL = "https://example.zitadel.cloud"
AuthenticationBackend definition
To create and update the users regarding the roles given in the authentications in ZITADEL a Subclass of OIDCAuthenticationBackend has to be created:
loading...
Which handles the users differently depending on if there are roles associated to:
admin-> superuserstaff-> staffuser-> userno role-> no user gets created
URLs
To handle the callback and logout the urls have to be added to the urls.py:
urlpatterns = [
    #...
    path("oidc/", include("mozilla_django_oidc.urls")),
]
So it should like something like this:
loading...
Configure and run the application
Never store and commit secrets in the ".env" or settings.py file
Authentication and authorization
To check the authentication and authorization the views in the polls application are extended with decorators:
loading...
@method_decorator(login_required, name="dispatch"): means that the user has to be logged in Django, which only happens if you have one of the 3 roles("admin", "staff" or "user")@method_decorator(staff_member_required, name="dispatch"): means you have to have at least a staff user ("admin" or "staff")/admin/: all admin sides are only accessible if you have a superuser with the role "admin"
Additional permission checks could be done with "permission_required" from "django.contrib.auth.decorators" also described in the Django documentation.
DB
Create and run migrations:
python manage.py migrate
Run
You can use a local Django server to test the application.
python manage.py runserver
Visit http://localhost:8000/polls or http://localhost:8000/admin and click around.
Completion
Congratulations! You have successfully integrated your Python Django application with ZITADEL!
If you get stuck, consider checking out our example application. This application includes all the functionalities mentioned in this quick-start. You can start by cloning the repository and defining the settings in the settings.py. If you face issues, contact us or raise an issue on GitHub.
What's next?
Now that you have enabled authentication, it's time for you to add more authorizations to your application using ZITADEL APIs. To do this, you can refer to the docs or check out the ZITADEL Console code on GitHub which uses gRPC and OpenAPI to access data.